This is the main part of the tutorial, the actual making of rag rugs, for preparatory stages see part 1.
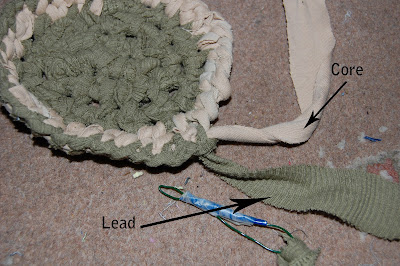
In this section you will often see me refer to the core and lead fabric strips, these are terms i use to describe the two different fabric strips needed to make a rag rug
The 'core' always runs through the center of the knots, it acts as tension control and strengthens the weave. It is also essential in the starting off stage as the lead is knotted around it to create the first row.
The 'lead' is the fabric that does most of the work, it forms the most visible part of the rug and it is to the lead that the tool is attached. The lead is used to create all the knots.
Basic Half Hitch
Before I go into the details of how to start off the rag rug, I'm going to show you how the half-hitch knots are made during the rug's construction. The half-hitch is the name for the knot used to create the rag rug weave ( it is also used in the creation of friendship bracelet style knot works).
Throughout the rag rug process you will do this knot, its a repetitive motion (not dis-similar from blanket stitch) that goes as follows:
1 - Pass the ‘lead’ under the ‘core’ and through the next stitch (hole) without pulling it through.
You may find it awkward at first to see where the next stitch is but you should soon be able to pick it out with practice - like I've mentioned in part 1 of this tutorial this technique seems tricky to start with but once you've got your head round it the method will seem really straightforward.
2 - Start to pull the lead through the stitch but stop before the loop the lead is making gets too small, then put the lead through the loop and pull tight. Ta da! the first of many half-hitch knots.
Starting off:
1 - attach 2 strips together, choose a lead then use the lead to make a “4” shape over the core
2 - pass the lead under the core and through the loop of the “4”, pull it into a knot that is loose enough to fit a finger through
3- again use the lead to make a "4" shape over the core then repeat step 2. For circular rugs make about 3 knots (in total) and for oval rugs make 4, though this is the amount I use it doesn't matter if you want to add more knots on this first row it will just potentially alter the rug's final shape.
4 - carefully turn the row of knots around so the core /lead are at the top and lie on the left of the knots
5 - pass the tool/lead under the core and push through the knot you have just made (top one) ,then through the loop and pull tight
6- continue knotting into the next stitch, starting with the one down from the knot you have just made and continuing on round and round - always passing under the core, up through the next stitch and through the loop
 |
| -1- |
 |
| -2- |
 |
| -3- |
 |
| -4- |
 |
| -5- |
 |
| -6- |
In order to keep the rug flat expanding stitches are needed, to expand simply knot twice into the same stitch. I find it helps to expand frequently in the first few goes round and less as it gets bigger... if the rug starts to curl up and becomes tight you need an expanding stitch ( this is an intuitive part of the process and depends on the rug, but curling is always a sign that more stitches are needed). However, if the rug starts to have wavy edges and won't lay flat on the ground too many expanding stitches have been added, if this is spotted early you can either stop adding expanding stitches until it flattens out or occasionally miss stitches to decrease the surplus.
To make basket-like rag rugs you have to play with expansion and tension, start as normal and when the rug is big enough for the base of the "basket" stop expanding and perhaps tug the core a bit tighter, the 'rug' should soon start to curl and will eventually start expanding upwards, you can experiment with different levels of expanding stitches and missing stitches to create a variety of shapes (it literally is an experiment - i don't have any particular rules on how to do this, i simply do and adjust as i see the changes happening). In such experiments I have managed to create a vase shape and a ball so I'd say the shape possibilities are fairly endless.
When the rug is at the size you want you have numerous options-
You could tie the core and lead into a bow or decorative not,
or discreetly tie the two strips (lead/core) to previous stitches to secure them, then cut short and tuck the ends out of sight.
Or even tie a knot in the lead and core before weaving the leftovers back through the stitches like the core.
Regardless of the method the important thing is to secure the ends so they cannot unravel (not that this knot is prone to that anyway) and to finish the product off nicely.
And so that concludes the tutorial, I'll leave you with a couple of examples of my rag rug creations:
 |
| Mug Coaster |
 |
| Small Basket |
 |
| Small Basket (view 2) |


No comments:
Post a Comment
Thank you for showing interest :)